I present three different steps in a journey of developing an API endpoint. We start with the simple and bare-bones API and add a (very bad) half-baked authentication solution. The pains of that moves us on to testing Cloud Endpoints in the Google Cloud Platform, before finally testing the waters of enterprise level API Gateways with Apigee, which is also a Google prooduct.
Three levels of API sophistication with and without gateways
I recently co-hosted a Meetup in the Google Developer Group on Cloud in Copenhagen where I presented a shortened version of this post. See the recording of the presentation on YouTube.
I will present three different steps in a journey of developing an API endpoint. With the rise of applications based on distributed microservices, the use of small simple APIs to handle the interaction between such services becomes still more wide-spread. Alernatives such as gRPC exist, but if you want to build a service that should also be available outside your organization or application, then exponsing a public REST endpoint will very often be a good approach.
However, it can be difficult to ensure that your endpoint provides sufficient: - stability to handle high loads, - security and control to avoid putting your infrastructure at risk, - documentation for application developers, - facilities for connecting new developers and applications.
In this post we will get a view of these subjects by looking at how we can evolve our small API and its associated gateways.
We start with the simple and bare-bones API and add a (very bad) half-baked authentication solution. The pains of that moves us on to testing Cloud Endpoints in the Google Cloud Platform, before finally testing the waters of enterprise level API Gateways with Apigee, which is also a Google prooduct.
Simple beginnings
We start with a very simple application where we expose a basic API without any real features. It will only have two endpoints and no security.
I have created a modified version of the bookshelf application from the GCP documentation. The source for my modified version can be found on Github.
If you want to follow along the guide with your own application you will need to create
a Firestore/Datastore dataset and define that dataset id in the file
config/database.yml in the application, based on config/database.example.yml. You
will also need to provide the application with JSON Service Account credentials for a
GCP service account that has access to the Datastore dataset and point to it in the
environment variable GOOGLE_APPLICATION_CREDENTIALS (see more
here).
It is a Ruby on Rail application (I haven't done that before, so I was curious). To see it locally, follow the guide to running it in the repo.
There is no authentication in this initial implementation. Everyone can access the web
interface as well as the API endoints. There are two:
- /api/v1/books: List all books.
- /api/v1/books/<id>: Return data on the book reflecting the given id.
But why don't we just implement our own authentication. It can't be that hard anyway. So we build this very naive, and very dangerous, authentication.
The implementation looks like this (on the naive-auth branch in the repo):
class BaseApiController < ApplicationController
    before_filter :authenticate_user_from_token!

    private
        def authenticate_user_from_token!
            valid_keys = ["veryS3cr4tT0kun", "f4variteS3cre7"]
            token = request.headers["X-Api-Key"]
            if !request.headers["X-Api-Key"]
                render json: {status: "unauthorized", message: "No API key given in header."}, status: :unauthorized
            else
                if !valid_keys.include?(request.headers["X-Api-Key"])
                    render json: {status: "unauthorized", message: "Invalid API key."}, status: :unauthorized
                end
            end
        end

end
Basically it says that if the passed API key is equal to one of the two hardcoded strings, then you are authorized to get in.
It is dangerous for several reasons: - The key is in the source! - Managing users implies changing source code. - No concept of a user.
Maybe it won't be long before you realize that your authentication implementation really sucks. You might then choose to spend a week writing up a solution for handling API keys that includes: - User database complete with user models and authentication in the backend. - Authentication with a robust and secure implementation (3rd party). A possible package for handling some of this in Ruby could be Devise.
This can work well enough, and maybe it will often be enough. You will have to maintain this of course, and to make sure that your solution stays secure. But let's say I accept that duty, and for a while I am happy, usage grows and the solution develops.
Outsourcing security and validation with Cloud Endpoints
But maybe a some point we might feel some pains. Maybe you see a need for: - Better monitoring of failures, performance, latency. - Knowing when people try to access the endpoint unauthorized. - Use of different authentication schemes such as JSON Web Tokens or OAuth. - Use with native SDKs in iOS, Android and Web.
And all this still has to stay fast and scalable.
This is the point where you might want to have a look at Cloud Endpoints. For our App Engine backend a good place to start could be this guide.
The way it works: A proxy between the backend and the world that receives and handles all requests before they are sent to the backend, and forwards all answers from the backend.
Setting up Open API
First we create an OpenApi definition file.
The first part of such a file looks like this:
swagger: "2.0"
info:
  description: "A Swagger definition for our Bookshelf API example."
  # Name of the API
  title: "Bookshelf API"
  version: "1.0.0"

# Hostname will correspond to the name of the app engine endpoint or an internal
# GCP endpoint
host: "cx-mschristensen-ruby.appspot.com"

# Data about input and output formats
consumes:
- "application/json"
produces:
- "application/json"

# Will it use https or just http (App Engine handles https automatically).
schemes:
- "https"
Then we add information about the paths that we expose, the so-called surface of the API:
# The base of all requests. The version number reflects the version number given
# above in the `info.version` field.
basePath: "/api/v1"

# Each individual path
paths:
  "/books":
    get:
      description: "Get a list of all books."
      operationId: "books"
      produces:
      - "application/json"
      responses:
        200:
          description: "List of all books contained in the system."
          schema:
            # Here we use a reference to a schema collected below
            $ref: "#/definitions/AllBooksResponse"

      # Define the type of security we want on the endpoint.
      security:
      - api_key: []
  # The {}-syntax gives names to url parameters
  "/books/{id}":
    get:
      description: "Get the book with the specified id."
      operationId: "book"
      produces:
      - "application/json"
      # The schema of the possible parameters.
      parameters:
      - name: id
        in: path
        description: "ID of the book that needs to be shown."
        required: true
        type: string
      responses:
        200:
          description: "Book"
          schema:
            $ref: "#/definitions/BookResponse"
      security:
      - api_key: []
Notice the "#/definitions" references in the snippet? They refer to model
definitions that we can describe in the definitions section:
definitions:
  Book:
    type: "object"
    properties:
      id:
        type: "integer"
      title:
        type: "string"
      published_on:
        type: "string"
      author:
        type: "string"
      description:
        type: "string"
  AllBooksResponse:
    type: "object"
    properties:
      status:
        type: "string"
      data:
        type: "array"
        items:
          $ref: "#/definitions/Book"
  BookResponse:
    type: "object"
    properties:
      status:
        type: "string"
      data:
        $ref: "#/definitions/Book"
Notice how we can nest these definitions to refer to the Book object inside
the two response descriptions of AllBooksResponse and BookResponse.
Absolutely necessary when dealing with bigger ontologies.
Finally we add some information about the security applied:
securityDefinitions:
  api_key:
    type: "apiKey"
    name: "key"
    in: "header"
This simply defines where the key is found (header) and what it is called
(key).
Check out the complete openapi.yaml
file.
Much more information about the OpenAPI format can be found in the Swagger specification. But remember that Cloud Endpoints uses Swagger 2.0, which is superseeded by 3.0 as the default specification.
Deploy the API and connect to our app
Deploy the definition to an endpoint service:
gcloud endpoints services deploy openapi.yaml
Update the app.yaml file for deploying to App Engine by adding information
about the API service:
endpoints_api_service:
  name: cx-mschristensen-ruby.appspot.com
  rollout_strategy: managed
Deploy the updated application:
gcloud app deploy
When this is run we have put a Cloud Endpoints proxy in front of our backend. This means that the backend application itself it not reachable from the internet. And since we have only documented our API endpoints in the OpenAPI definition, the visual application is now off. If we want, of course we could configure that to be publicly available.
This also means that we cannot connect to the API yet, because we will also need an API key. For now we will just create an API key in the Cloud Console. 1. Go to https://console.cloud.google.com/apis/credentials 2. Select "Create credentials" and select "API key".
This will create a key that we can use for testing.
We run a query in the endpoint:
curl -X GET \
     "https://cx-mschristensen-ruby.appspot.com/api/v1/books/5639445604728832?key=[API-KEY]"
With Cloud Endpoints it is only possible to pass the api key as a url parameter – putting it in the header is therefore not an option.
Managing users with Cloud Endpoints
Let's imagine a couple of restrictions on how we might want to expose our endpoint: - We need to distinguish between different users of our API. - We want to add quotas to users. - We want to distinguish between a client application and an invidivdual user.
Here are some things that we should be aware of.
API keys are used to identify calling projects (that is, GCP projects), while JSON Web Token (JWT) based approaches such as Auth0, Firebase and Google ID tokens are used to identify individual users. So by enabling both types of authorization, we can open up the API for different types of users and client applications.
This could serve two purposes: 1. Keeping track of who uses the application. 2. Setting quotas for how much different users can consume.
However: (1) As far as I can see, there is no good way to keep track of or get an overview over which users use the application more or less. And (2) quotas can only be set in API key, not JWT based authentication schemes.
This means that other GCP projects can be granted access to the API, providing that they have an API key that they generate their own projects. This means that in this way separate applications that need access to the API have to be GCP projects for you to be able to identify where each call comes from. See the details in the section about how to share API with keys.
If we don't need to be able to identify each caller, we can either create a new API key within our own project and give that to the calling application, or we can give all client applications the same key. No matter what we still need to manage the keys ourselves. Because a key is connected to a project, and that is the level at which quotas are configured, it is not possible to manage quotas unless every client is a separate GCP project. To study this more, see the section of the documentation about quotas.
This means that managing users and getting an overview of who uses your application to a certain extent is convoluted and very limited in its possibilities. This raises the question, what can we do in stead? This is where Apigee gets into the picture.
Apigee for analytics, security, quotas and much more
From the Apigee Edge getting started guide:
An API proxy is your interface to developers that want to use your backend services. Rather than having them consume those services directly, they access an Edge API proxy that you create. With a proxy, you can provide value-added features such as:
- Security
- Rate limiting
- Quotas
- Caching & persistence
- Analytics
- Transformations
- CORS
- Fault handling
Navigating the extensive Apigee documentation and getting your head around their different layers of functionality and terminology is no small feat. And getting the whole composition of steps configured in a correct and functional way is also a daunting task. But with the effort spent comes an incredible amount of power and some impressive features.
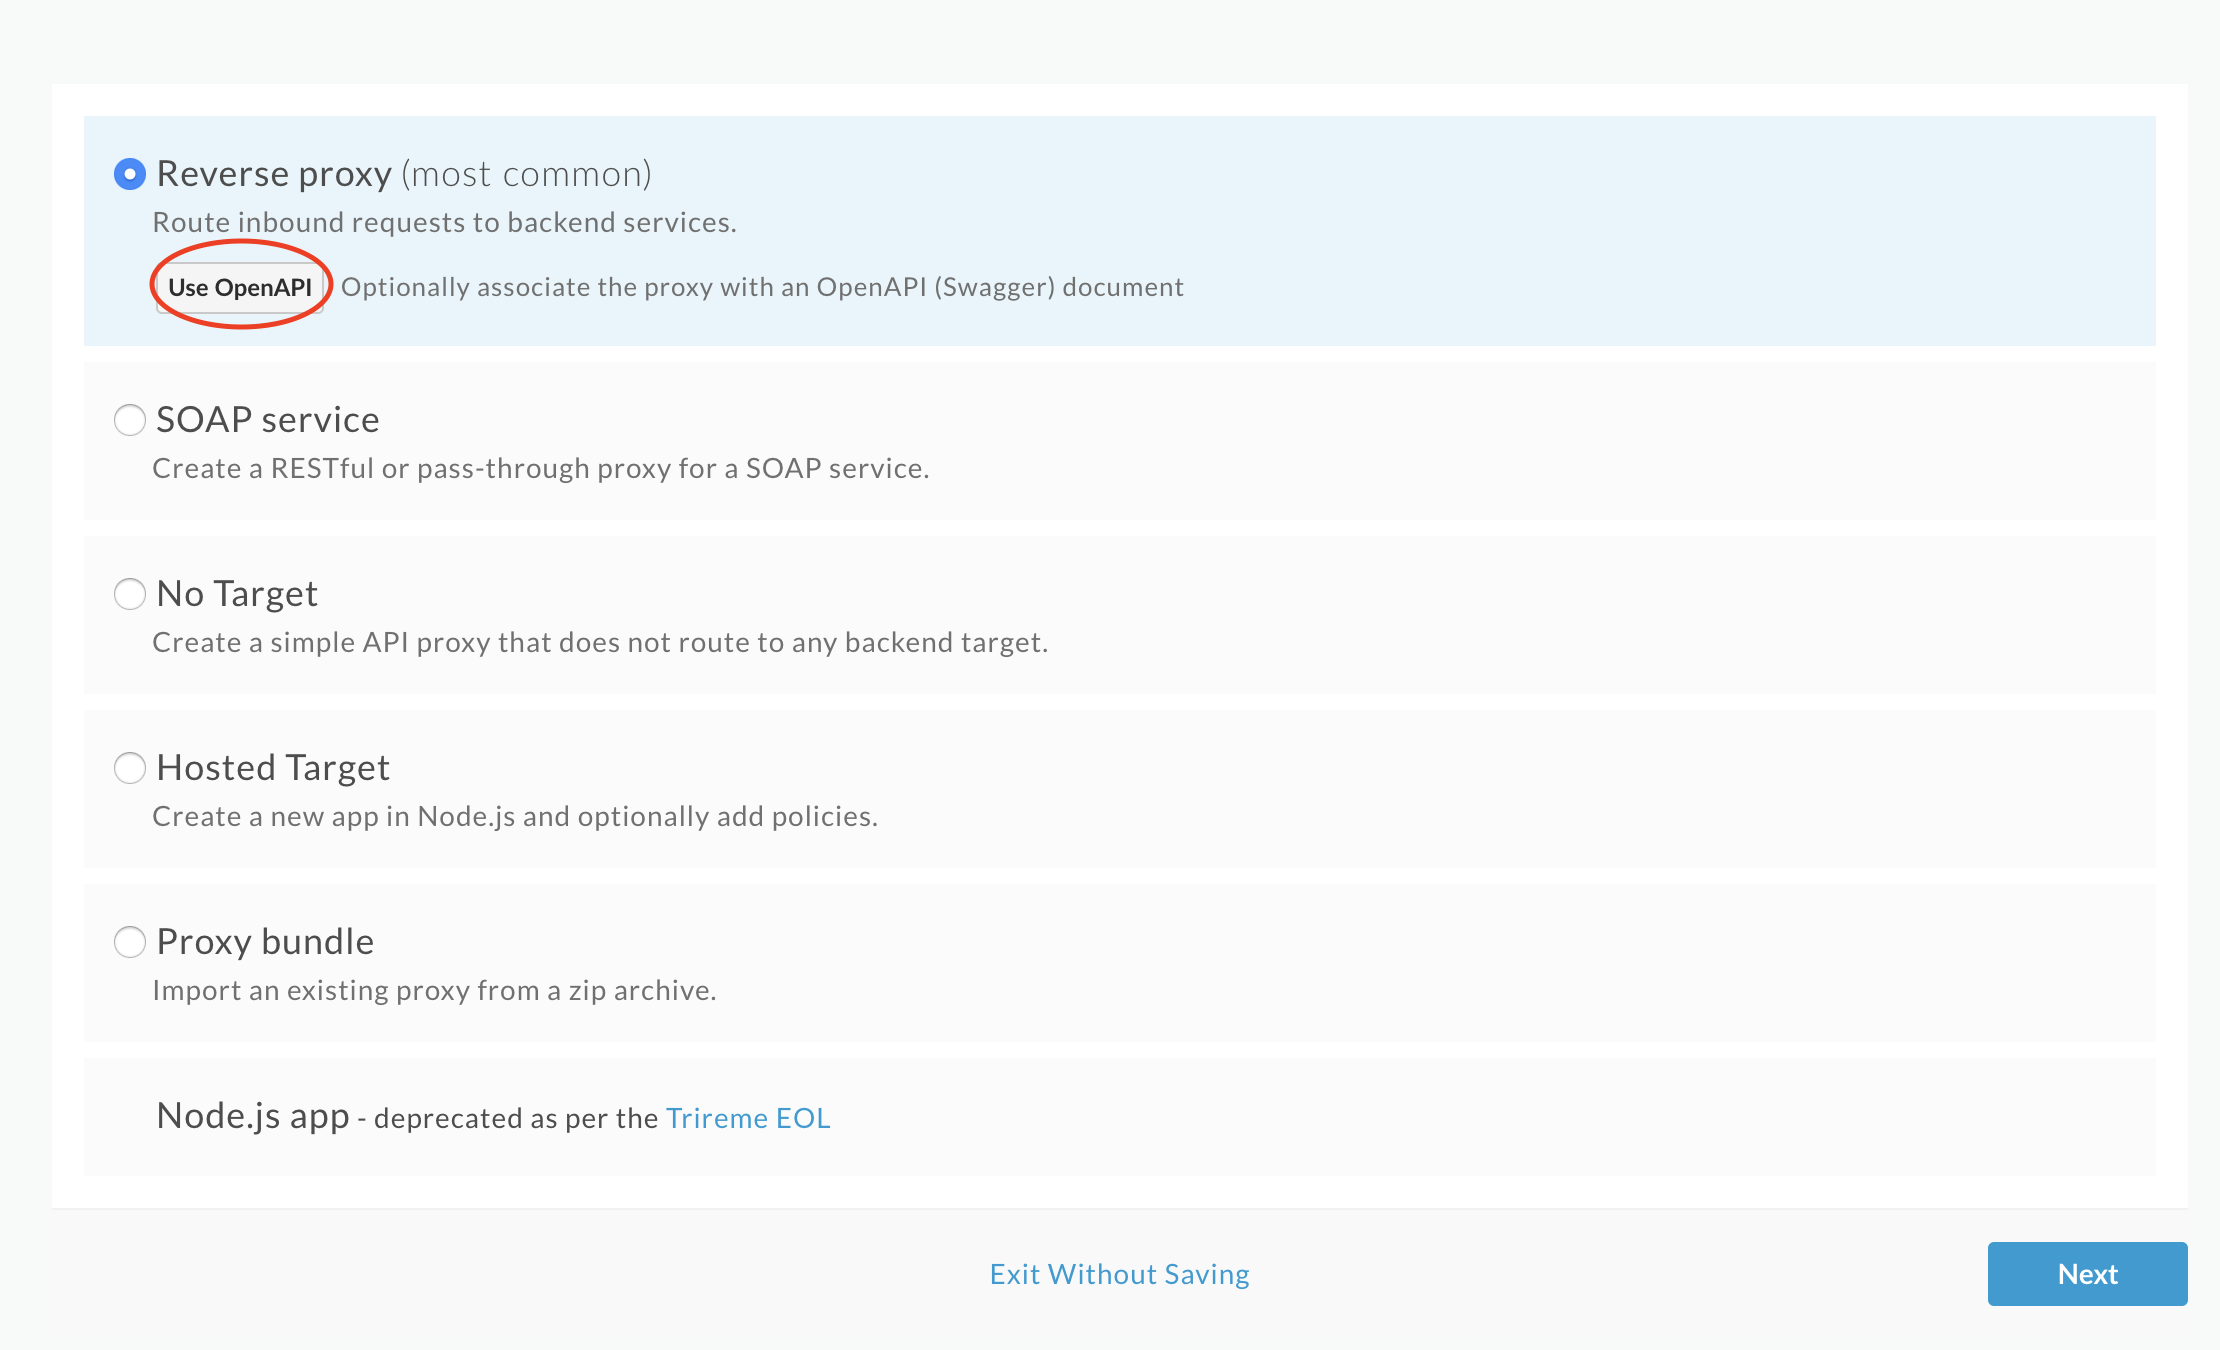
To get up and runing following the existing getting started guides of Apigee is quite helpful. When we come from the Endpoints setup we are even helped a bit extra as we already have an OpenAPI definition of our endpoint that we can also just import into Apigee to define its specification. Remember to choose the "Use Open API" option when creating the proxy, then most of the setup is already done.
If we now navigate to the new proxy and select the "Develop" pane in the top, we will see an overview of the endpoints and flows for the proxy.
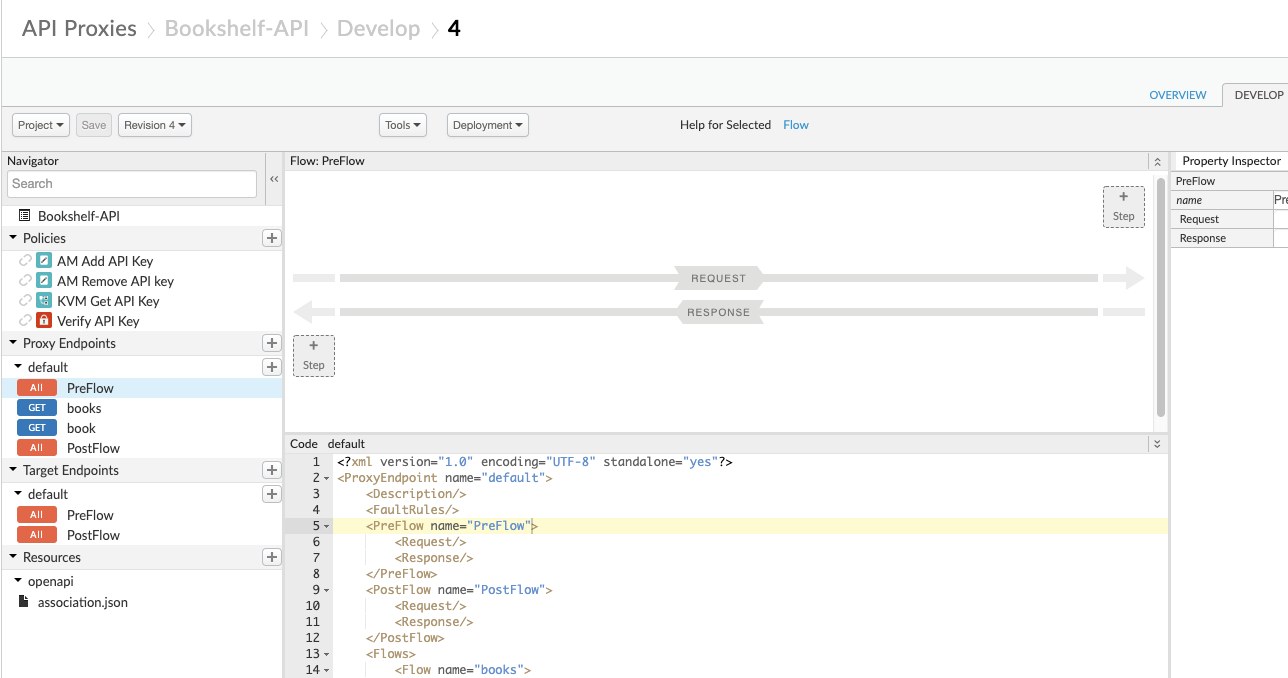
Proxy endpoints are the Apigee endpoints that you want to expose to the user client. Target endpoints are the backend endpoints that the Apigee gateway will releay the incoming messages to.
Clicking at the "default" name under "Proxy Endpoints" we will see the configuration of that defined as follows:
<?xml version="1.0" encoding="UTF-8" standalone="yes"?>
<ProxyEndpoint name="default">
    <Description/>
    <FaultRules/>
    <PreFlow name="PreFlow">
        <Request>
        </Request>
        <Response/>
    </PreFlow>
    <PostFlow name="PostFlow">
        <Request/>
        <Response/>
    </PostFlow>
    <Flows>
        <Flow name="books">
            <Description/>
            <Request/>
            <Response/>
            <Condition>(proxy.pathsuffix MatchesPath "/books") and (request.verb = "GET")</Condition>
        </Flow>
        <Flow name="book">
            <Description/>
            <Request/>
            <Response/>
            <Condition>(proxy.pathsuffix MatchesPath "/books/*") and (request.verb = "GET")</Condition>
        </Flow>
    </Flows>
    <HTTPProxyConnection>
        <BasePath>/bookshelf</BasePath>
        <Properties/>
        <VirtualHost>secure</VirtualHost>
    </HTTPProxyConnection>
    <RouteRule name="default">
        <TargetEndpoint>default</TargetEndpoint>
    </RouteRule>
</ProxyEndpoint>
Not much is defined yet, it only describes the two endpoints for the method of getting a single book or all books.
Similarly, the default target endpoint looks like this:
<?xml version="1.0" encoding="UTF-8" standalone="yes"?>
<TargetEndpoint name="default">
    <Description/>
    <FaultRules/>
    <PreFlow name="PreFlow">
        <Request/>
        <Response/>
    </PreFlow>
    <PostFlow name="PostFlow">
        <Request/>
        <Response/>
    </PostFlow>
    <Flows/>
    <HTTPTargetConnection>
        <Properties/>
        <URL>https://cx-mschristensen-ruby.appspot.com/api/v1</URL>
    </HTTPTargetConnection>
</TargetEndpoint>
Notice how the TargetEndpoint.HTTPTargetConnection.URL points to the backend service
that we created earlier.
If we try to visit this now, we will get rejected because we still have the Cloud Endpoints running with a requirement of an API key. So first we will set up the API key handling with that last piece of the path.
Managing last-mile security with keys
We still want to maintain a security procedure for the communication between Apigee and our own backend. Otherwise, if somebody picked up the URL of the Cloud Endpoint proxy (for example from this guide, a co-worker, or some unintentional leak in a setup) they would be able to bypass all the security that we configure in the Apigee layer.
It is therefore also important to maintain TLS communication with the backend layer, as the keys transported must be sent over an encrypted connection.
The keys are secrets and must therefore be stored in an encrypted key-value store within
Apigee, called the Key Value Map. To create that go to Admin > Environments > Key
Value Maps, create a new map with an appropriate name such as
"CloudEndpointCredentials". You will need the name in a bit. When creating the map, make
sure to check the "Encrypted" checkbox. Now add a key by the name apikey and give and
api key for the Endpoints layer as the value. It will be the same key (or an equivalent)
as the one we set up in the previous section when creating an API key for Endpoints.
Now we add that key to the query that we send to the target endpoint. In the
development pane of the proxy, in the PreFlow, we add a step called Key Value Map
Operations. and give it an appropriate name such as "KVM Get API key".
The XML definition looks like this:
<?xml version="1.0" encoding="UTF-8" standalone="yes"?>
<KeyValueMapOperations async="false" continueOnError="false"
  enabled="true" name="KVM-Get-API-Key" mapIdentifier="CloudEndpointCredentials">
    <DisplayName>KVM Get API Key</DisplayName>
    <Properties/>
    <ExclusiveCache>false</ExclusiveCache>
    <ExpiryTimeInSecs>300</ExpiryTimeInSecs>
    <Get assignTo="private.apikey" index="1">
        <Key>
            <Parameter>apikey</Parameter>
        </Key>
    </Get>
    <Scope>environment</Scope>
</KeyValueMapOperations>
Notice ther mapIdentifier attributes on the KeyValueMapOperations element. That is
where you put the name of the Key Value Map that we just created.
We then tell it to pull the apikey key from the key-value map and put it in a
parameter called private.apikey. It is prefixed with private because it is
encrypted.
Now that key will be available at runtime for the pre-flow actions. Then we assign that to a query parameter by adding a Assign Message step. It looks like this:
<?xml version="1.0" encoding="UTF-8" standalone="yes"?>
<AssignMessage async="false" continueOnError="false" enabled="true" name="AM-Add-API-Key">
    <DisplayName>AM Add API Key</DisplayName>
    <Add>
        <QueryParams>
            <QueryParam name="key">{private.apikey}</QueryParam>
        </QueryParams>
    </Add>
</AssignMessage>
We see that it adds the query parameter key with the value {private.apikey} to our
query.
After setting this up, saving and maybe deploying to the test environment, we should be able to access our endpoint.
We should therefore be able to access the endpoint without any front gate credentials, but with the last-mile security handled by Apigee:
curl --request GET \
  --url https://mschristensen-eval-test.apigee.net/bookshelf/books \
Setting up front gate API keys
Having set up an open proxy, it is time to secure it. There is a guide, which can be useful, although it assumes that you have not yet setup the proxy.
Now we add two flow steps to the Proxy Endpoint to enable API keys:
First we add a pre-flow step called "Verify API Key". By default it expects a query parameter called "apikey", and we will just use that. Mine looks like this:
<?xml version="1.0" encoding="UTF-8" standalone="yes"?>
<VerifyAPIKey async="false" continueOnError="false" enabled="true" name="Verify-API-Key">
    <DisplayName>Verify API Key</DisplayName>
    <Properties/>
    <APIKey ref="request.queryparam.apikey"/>
</VerifyAPIKey>
Then we add a step called "Assign Message", where we remove the client's API key for the rest of the processing. After successful verification it is no longer needed so we keep the call tidy and lock down the security of the key a bit more.
<?xml version="1.0" encoding="UTF-8" standalone="yes"?>
<AssignMessage async="false" continueOnError="false" enabled="true" name="AM-Remove-API-key">
    <DisplayName>AM Remove API key</DisplayName>
    <Remove>
        <QueryParams>
            <QueryParam name="apikey"/>
        </QueryParams>
    </Remove>
</AssignMessage>
After you press save (and maybe have to deploy the change to the test endpoint), the endpoint will be ready.
To test this we need an API key. So we might as well setup a developer portal to make it easy for developers to create such keys.
Creating a developer portal
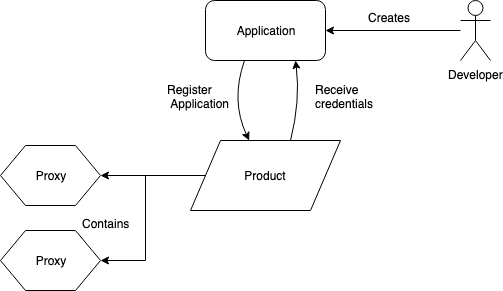
Credentials are created in the following way: 1. You need an API Product. 2. An API Product will be connected with one or more API Proxies. 3. A user can then create an app that makes use of that API Product. 4. This makes it possible for them to create credentials for the product.
These relations are illustrated in this simple drawing:
First, create an API product that describes a collection of one or more proxies. Then we can enable a developer portal where we give access to the products defined and under which circumstances a developer can sign up for the products. Out of the box the user gets access to API documentation, guides and the possibility of registering for an API product and receive an API key.
This has tremendous potential because it removes the whole administration of users and credentials completely from the API administrator. It is entireyl offloaded to the developer portal. And this is where you really see Apigee shining, because it has a rich and robust concept of users, applications, products and proxies, a lot of flexibility and power is available at very little work.
Spike arrest policy
To illustrate how this concept of the user, products and applications plays together in a final example, we can see how to configure a spike arrest policy.
In each API product we can define a quota of how many requests are allowed within a given period. When that is applied we add a new PreFlow step to the proxies used in the product with the following simple xml:
<?xml version="1.0" encoding="UTF-8" standalone="yes"?>
<SpikeArrest async="false" continueOnError="false" enabled="true" name="Spike-Arrest">
    <DisplayName>Spike Arrest</DisplayName>
    <Properties/>
    <Identifier ref="request.header.some-header-name"/>
    <MessageWeight ref="request.header.weight"/>
    <Rate>30pm</Rate>
</SpikeArrest>
The <Rate>30pm</Rate> translates to 30 requests per minute. In this way the
application will receive a 429 "Rate exceeded" error once the threshold is passed.
Final remarks
In this post I have showed three levels of API sophistication. In some cases the first and simplest solution, where an API application also contains its own authentication (through a properly supported, robust, and trusted 3rd party solution, not a home-baked authentication), can be enough and get you very far.
But often you might want to offload that responsibility to a 3rd party, and here Cloud Endpoints can be a good solution. That also gives you monitoring features, it will handle different types of authentication, including integration with native SDKs for iOS and Android, and it ensures that all unintended routes of your application are closed completely off.
If however you may need a strong and flexible concept of the user and consumer applications, if you want to compose more different API backends in requests, if you need more fine-grained monitoring, or many more Enterprise level features, Apigee may be worth having a look at. Apigee is an enterprise level product, and that means that the pricing models might be outside the budget of hobby projects or small businesses.
With a setup where the backend is fronted by Cloud Endpoints, which then connects with Apigee, I have experienced some latency issues. It is unclear whether that is simply an effect of the different layers of proxies and natural network delays, or whether there is a penalty from sitting on a free tier level on Apigee. Debugging these latency issues has been difficult because the numbers reported from different monitoring backends has been different. To get a proper overview of this, more testing and some more sophisticated tracing or monitoring might need to be set up.